![[Hot] [K:\>] কিভাবে কোন প্রোগ্রামিং ছাড়া Sketchware দিয়ে বানাবেন আপনার নিজস্ব [[[ App Uninstaller]]](https://trickbd.com/wp-content/uploads/2018/05/05/5aedc69c8e576.png)

আজ আমরা সিম্পল আন্ডোয়েড অ্যাপ তৈরি করব।এজন্য আপনার কোন কোডিং জ্ঞান থাকতে হবে না।শুধু শিখার ইচ্ছা থাকতে হবে।
শিখার ইচ্ছা থাকলে অবশ্যই আপনে পারবেন।
আমাদের মিশনন এক্টাই আমরা অ্যাপ তৈরি করব আন্ডোয়েড ফোন দিয়েই।
আপনারা যারা বড় ডেভলোপার তারা পোস্ট টা ইগনর করতে পারেন । কেননা এখানে আমি অনেক ছোট থেকে শুরু করব।
এজন্য যে ছোট থেকে কোন কিছু না শিখলে তা পরিপুর্ণ শেখা হয় না।আপনারা যদি চান তাহলে আমার সব পর্ব গুলি শেষ করতে পারব।
আমরা যে অ্যাপ নিয়ে কাজ করব সেটি হচ্ছে Sketchware.
app টি প্লে স্টোরে পাবেন।তাছাড়া অ্যাপ টি নিয়ে trickbd তে পোস্ট আছে। তাই বেশী বলার দরকার নাই।
থাক অনেক বলে ফেললাম, আজ ছোট একটি অ্যাপ মেইক করা শিখাব। অ্যাপ টি হচ্ছে Uninstaller.
১মে Sketchware app টা নামিয়ে নেন।
তারপর ওপেন করে New Project এ যান।
অ্যাপ নাম। আইকন দিয়ে App Create করুন
[Start](Follow Screenshot)
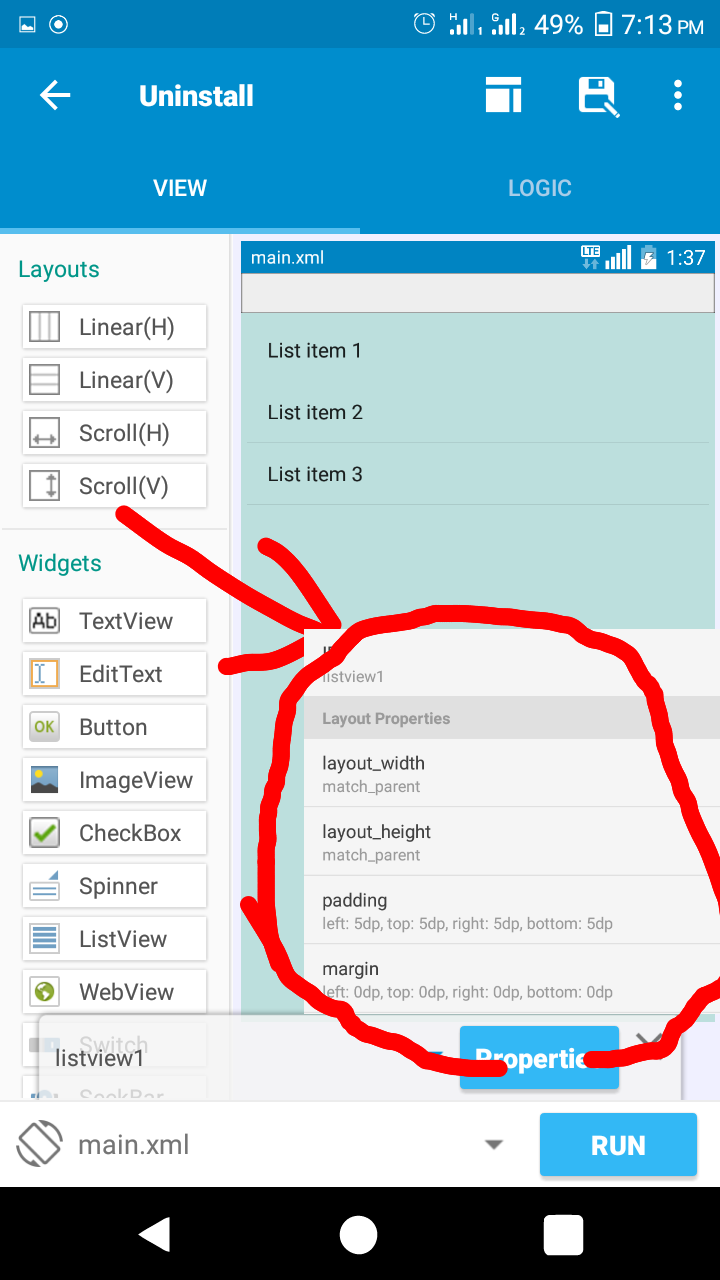
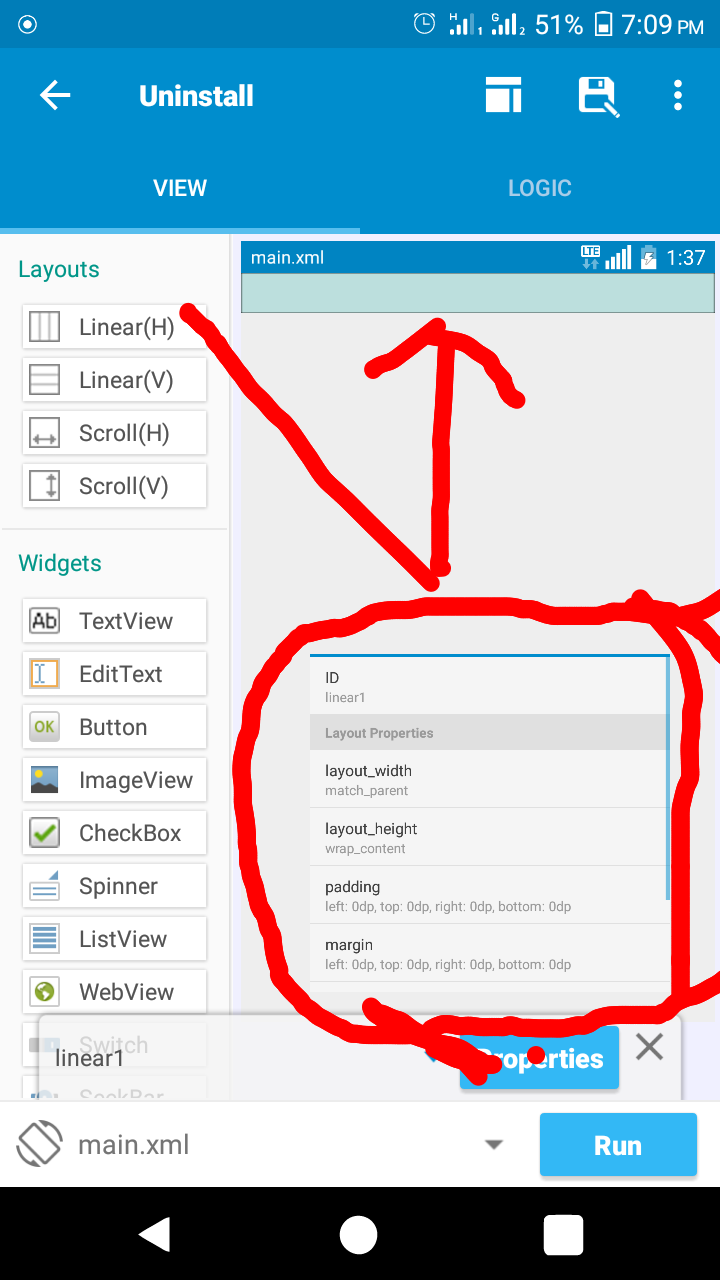
!! Insert A New Linear (H) And Set Property↓
Layout Height = Match Parent
Layout Weight = Warp Content
Scroll and Set
Background Color = (Your Wish)
______________
!! Insert A ScrollView (V) In Down Of Linear
[Don’t Insert Into Linear]
Then Set Property↓
Layout Height = Match Parent
Layout Weight = Match Parent
Scroll and Set
Background Color = (You Wish {{I recommend set it None}} )

________________
Now Go On The Logic Tab And Enter (Oncreate Activity)
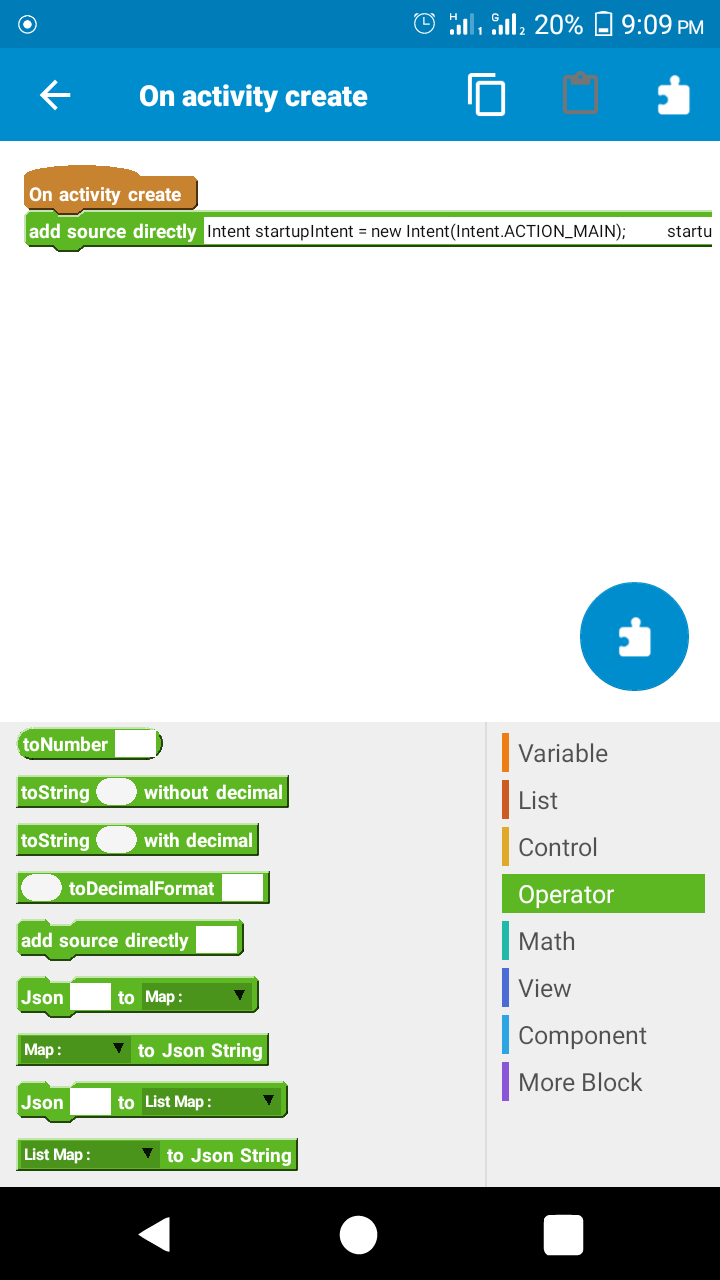
Add An {{{ add Source directly}} block From operator
inside the block paste this code
———————————-
Intent startupIntent = new Intent(Intent.ACTION_MAIN); startupIntent.addCategory(Intent.CATEGORY_LAUNCHER); final android.content.pm.PackageManager pm = getPackageManager(); List activities = pm.queryIntentActivities(startupIntent,0); Collections.sort(activities, new Comparator() { public int compare(android.content.pm.ResolveInfo a, android.content.pm.ResolveInfo b) { android.content.pm.PackageManager pm = getPackageManager(); return String.CASE_INSENSITIVE_ORDER.compare( a.loadLabel(pm).toString(), b.loadLabel(pm).toString()); } }); ArrayAdapter adapter = new ArrayAdapter( this, android.R.layout.simple_list_item_1, activities) { public View getView(int pos, View convertView, ViewGroup parent) { TextView tv = new TextView(MainActivity.this); android.content.pm.ResolveInfo ri = getItem(pos); tv.setText(ri.loadLabel(pm)); LinearLayout lin = new LinearLayout(MainActivity.this);ImageView iv = new ImageView(MainActivity.this);iv.setImageDrawable(ri.loadIcon(pm));lin.addView(iv);lin.addView(tv);tv.setGravity(Gravity.CENTER_VERTICAL);tv.setPadding(16,0,0,0);tv.setTextSize(16);tv.setLayoutParams(new LinearLayout.LayoutParams(LinearLayout.LayoutParams.MATCH_PARENT,LinearLayout.LayoutParams.MATCH_PARENT ));LinearLayout.LayoutParams p = new LinearLayout.LayoutParams(LinearLayout.LayoutParams.WRAP_CONTENT,LinearLayout.LayoutParams.MATCH_PARENT);p.width = 70;p.height = 70;p.bottomMargin = 4;p.topMargin = 4;iv.setLayoutParams(p);lin.setPadding(6,6,6,6);return lin; } }; listview1.setAdapter(adapter); listview1.setOnItemClickListener(new AdapterView.OnItemClickListener() { @Override public void onItemClick(AdapterView adapter, View v, int position, long id) { android.content.pm.ResolveInfo resolveInfo = (android.content.pm.ResolveInfo)adapter.getItemAtPosition(position); android.content.pm.ActivityInfo activityInfo = resolveInfo.activityInfo; if (activityInfo == null) return; Uri packageURI = Uri.parse(“package:”.concat(activityInfo.applicationInfo.packageName)); Intent uninstallIntent = new Intent(Intent.ACTION_DELETE, packageURI); startActivity(uninstallIntent); } });;
—————————————–
Now Save Your Project.Then Go Back Into View Tab.
Customizing Part
—
Add A Textview Inside The linear Ans Set Properties
Height = Match _parent
Weight = Warp Content
Padding = 13 (All)
Margin = 10 (Left)
Scroll Down
Text = (Your App Name)
Size = 16 px
Style = Bold
Color = Your Wish( Me Red )
Go Back And Insert A Lainer (H) inside Linear1
Set Properties
Height = Match Parent
Weight =Match Parent
Padding = 0(All)
Gravity =right [ Not layout gravity ]
—-
Insert A Textview In Linear 2
Set Properties
Height = Match _parent
Weight = Warp Content
Padding = 13 (All)
Margin = 10 (Right)
Scroll Down
Text = Exit
Size = 14 px
Style = Bold
Color = Your Wish( Me Red )
_______
Now Go To Logic Tab And Add New Event Via (+) Button On right.
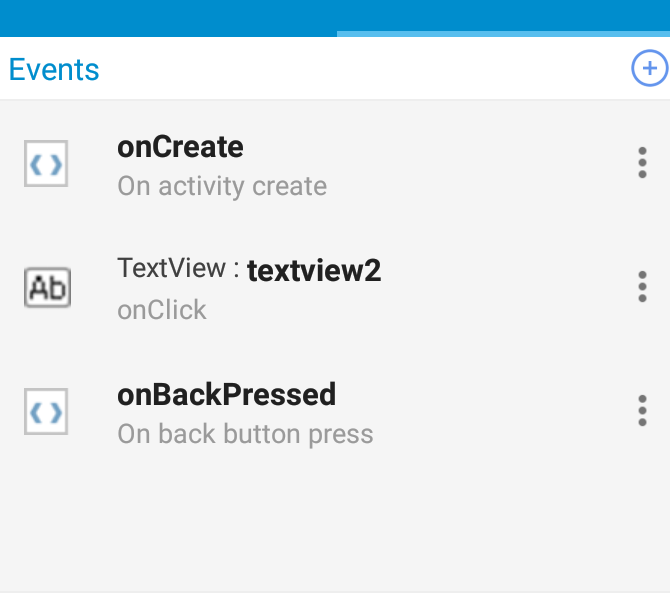
—-
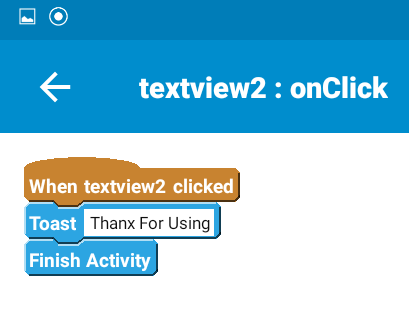
Go on Textview2(onclik)
add blocks↓
Go on onbackpressed
add block↓
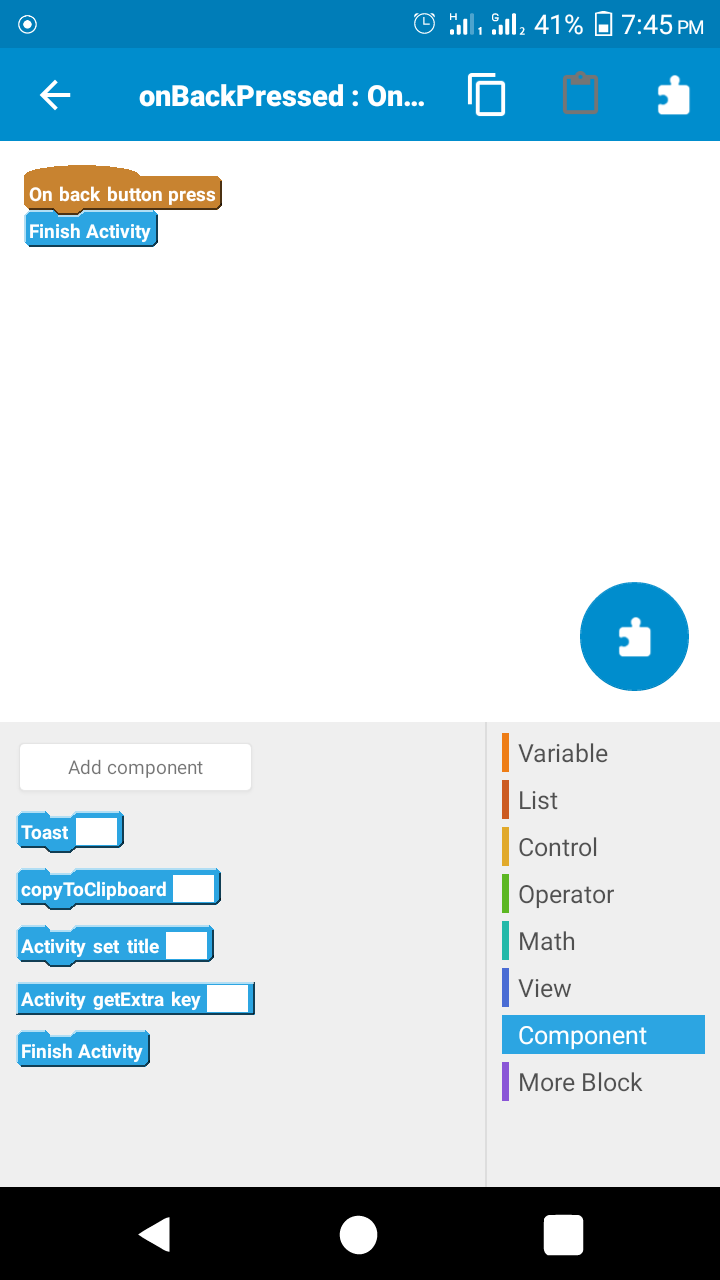
Save Your Project…
(Finnaly Run It And See)
_____________________________________
My App Screenshot
_________________________________
????????????????????????????????????????????? ????????????????????
???????
!!! By Amit Hasan
_____________________
!!! The End
[mone hoy apni np= nice post leksen
but np = no problem o mone hoy.. lol]
????
olpo English olpo bangla vlo lage na
https://play.google.com/store/apps/details?id=com.codes.brary
???????