

I have recently added tutorial to add HTML link maker tool in your wapka site as webmaster service for newbies and today we will make our image maker tool, it will be same as the previous tutorial but will have different code.. 🙂
Lets do it.. Follow these steps to add HTML image maker toolkit to your free wapka site
1. Login to your free wapka account
2. Goto Admin Mode
3. Add New Page via ES > NEW PAGE > name it Link Maker Tool
4. Open the created page
5. Now note the site ID of the page you just opened. Suppose its 1 (It will be different for you)
6. Now add the following code via ES > WML/xHTML code
</p><br />
<form action="">Image ALT: </p><br />
<p>Image URL: </p><br />
</form><br />
<p>
7. Now Add the following code via ES > WML/xHTML code
Your Link is Created</p><br />
<p><textarea><img src="" alt=":get-name:" /></textarea>
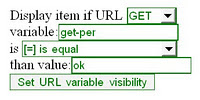
8. Goto ES > Uses > Item Visibility > Click g c t l p u this link on above second code > Click “URL GET variable” > in next page set variable = get-per and is = equal then value = ok Something Like this image
> Set URL Values
9. Now go back to your page and now you can check your tool in user mode Thats it, your tool is now added and is useful for any webmaster in the world..
This is most widely used by the newbies and I think they will love this tool.. Any bugs report or suggestions are most welcome.
This post first published on DuniarTips…
17 thoughts on "Add HTML Image Maker Tool in Wapka Site"